
Years ago, I purchased a book by Sue Dogget titled, Bookworks. Every so often, I'll pull it down off the shelf and swoon over all the exquisitely detailed book designs featured between the covers of this inspirational book. Over the years, I've experimented with some of the simpler projects like pamphlet folding and the basic sewing it involves. I've also made some basic hardcover journals with mixed success, but I could never find a glue that didn't cause the cover paper to wrinkle up like an old lady. And on the rare occasion the paper did remain flat, it didn't stick. I gave my cousin one of these disasterous books for her birthday one year, and as she pulled it from its wrapping the decorative cover paper started to flap free from the cover board. EEEKK!! Not good! With all that trouble, you can probably understand why I've never made any of the more involved hard-cover projects.
This glue issue was really bummin' me out, so I finally decided it was time to solve it once-and-for-all. I set about trying every type of glue and tape I could find. And believe me, I've tried lots of 'em. Lots. Take a look at my collection of glue:

And tape:

The double-sided tapes work great, but they're not cost-effective for big projects like this (nor are they recommended by the pros). They're also not reversible, meaning once they're stuck, they're stuck. You can't use water to reverse the glue and remove the paper. Yes, you can get repositionable versions that can be lifted up and repositioned, but they never become permanent, which is no good for a book cover.
Recently, I read a review online about YES brand paste and decided to give it a try. It's a little pricey at $11 to $15 per pint (especially for this thrifty girl), but I decided to give it a try. Let me just say, this stuff is AMAZING! You don't need much, just a thin layer, and it dries nice and flat. Perfecto!

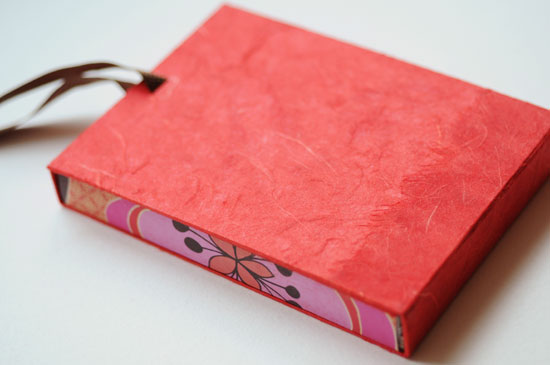
Once I was armed with the power of YES paste, nothing could stop me (Okay, maybe that's a bit of an exaggeration, but I reserve the right to hyperbolize). Alright, I'll stop blathering and show you the book I made. I followed the Four Books In a Box tutorial featured on page 108 of Bookworks and here's what I ended up with:

I made a few adjustments, mainly I decided to make a set of three, instead of four, journals, and I made mine much thicker. Each little journal was made out of a selection of new and recycled papers held together with a traditional Japanese stab stitch binding using the Yotsume Toji stitch.


The wraparound box is covered in a rich red mulberry paper, which is very strong, almost cloth-like.

The darker red edge of the cover (check out the first photo of the book above for a better view of the edge.) was created by layering a second strip of mulberry paper on top of the first. I wet the edge and pulled bits of the paper from it to create a featured look so it would blend with the paper below.

The three little books are tucked neatly inside the wraparound box and are secured by two flaps that hold them in place.


I'm really happy with how it turned out and it's given me new motivation to continue trying more difficult projects. Anyone else struggle with a particular craft supply until finally finding the perfect solution?
No comments:
Post a Comment