
To start things off I've selected a very simple origami wreath. I found the instructions over at Domesticali. You can view them here. She does a fabulous job explaining how to put this wreath together, but I felt compelled to do my own tutorial as well.
You can use any decorative paper you like. I had this book of old fonts from college, and I thought it might make an interesting pattern so that's what I used. You can use paper varying in weight from very light (20 lb standard computer paper) to very heavy (100 lb cover paper). But we found a paper weight somewhere in between to be the best (roughly 40 lb). If you want to use a heavier paper, I would suggest making one of these wreaths with a light weight paper first, just to get the hang of it, and then work your way up to heavier papers. The lighter papers are easier to work with at first.

To start, cut 8 4cm x 8cm strips of paper.

Then fold each piece in half lengthwise (If your paper is one-sided, make sure the patterned side is on the outside)...

so you end up with something like this:

Then fold each piece in half width-wise, like this:

Now open up the piece and, with the open side of the original fold facing up, fold down the left side of the paper to create a triangle like this:
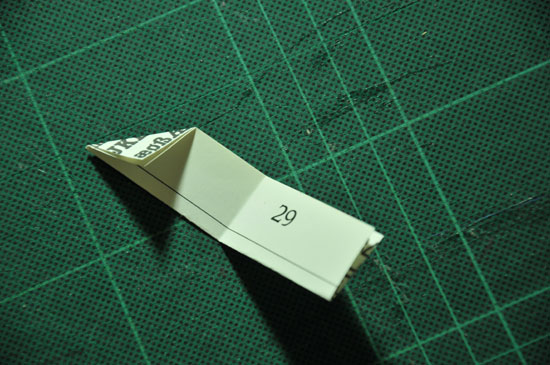
Now do the same thing to the right side so you end up with this:

Do the same thing to all eight pieces of paper. You should now have eight little strips of paper with corners folded down.

Take one folded piece and look closely at it. Notice how it almost has two little pockets. The top two layers of paper create the top pocket and the bottom two layers of paper create the bottom pocket.

You're going to insert the points of one of your little folded papers into these pockets. One point goes in the top pocket and the other point goes in the bottom pocket, like this:

Continue inserting each of your eight papers into the previous paper's pockets...

...until you've got all eight done. The final piece of folded paper will insert its points into the first piece you started with to create the finished wreath form.

That's it!

After I created a few wreaths in prep for craft day, I realized this little unassuming wreath had unlimited design possibilities. In the instructions above, I had you cut your strips of paper into 4cm x 8cm strips, but you could make almost any size by adjusting the measurements as long as you keep it 1 to 2. For example, to make a larger wreath I cut my paper to 4"x 8", wrapped it with 1" wide ribbon and ended up with this:


As you can see, the possibilities are endless: candle rings, ornaments, package decoration. You could string several together and create a garland. Don't think for a minute this is only good during the holidays. I used lots of colorful papers that would work any time of year. Brook even created one out of an old calendar I had with a drawing of lavender. Unfortunately, in all the excitement I forgot to photograph it. I hope you feel as inspired as we do about this project. We'd love to see what you create if you try this one yourself. Happy crafting.

2 comments:
I LOVE craft day! Next time I should bring my creations over so you can add photos of them. I made two new wreaths last night and tonight I am planning on making a big one with 6x12 pieces. I'll let you know how it goes!
I made another two wreaths today (is there something in the water?)!! I made one from a greeting card and the other from some scrap vellum I had. The vellum is lovely because it's semi-transparent so you can see the folds underneath. It creates a really cool effect. Definitely bring your wreaths over and I'll photograph them and add them to the post! I can't wait to see how your 6x12 version turns out!!!
Post a Comment