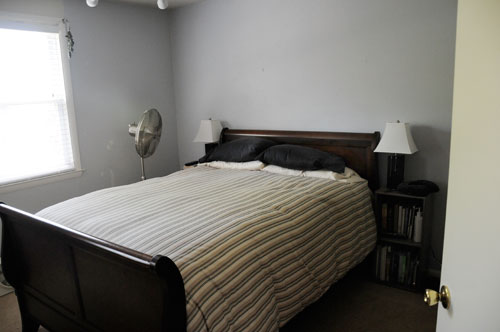
Surprise! The master bedroom is now the office and the office is now the master bedroom. Bet you didn't see that one coming. I barely saw it coming. The thing is, the master bedroom is the largest of the three bedrooms in our home. One of the other two bedrooms serves as our office and the third one serves as a guest bedroom. The room we were using as our office only measures about eight feet by eleven feet, which is pretty small. Scratch that. VERY small. This meant that a lot of office-related furniture started spilling over into our bedroom. Zach suggested we swap our bedroom with our office so we would have more space. I thought it made sense. So we did it.
Here's how it all went down
We moved all our office crap, minus the furniture, into our guest bedroom.
We moved some of the office furniture into what would become the new office.
Then the room looked like this (note the hideous blue rug):
We left the rest of the office furniture in the old office for me to trip over and walk into while I painted that room in preparation for it to become our new bedroom. I didn't want to spend more money on paint when I already had a million gallons leftover from other painting projects. I'm exaggerating. I probably only have about nine-hundred thousand leftover gallons. To avoid adding yet another partially-used gallon of paint to the mix, I did just that - mixed. That's right. I mixed about three different paints together. I found a whole gallon of a creamy white paint left by the previous owners and I added a bit of teal and black to it, to get a bluish-grey color.
After I finished painting, we moved some more furniture and waited for the nasty paint smell to dissipate so we could move our bed into our "new" bedroom.
While I was waiting, I hung some curtains, centered the rug, and vacuumed.
A few days later...
At this point we got tired of waiting for the paint smell to completely dissipate, so we disassembled the bed in our old bedroom (the new office) and reassembled it in our new bedroom (the old office).
And now our bedroom looks like this:
I told you the room was small! I still have to hang some art and decide if I like the dresser in front of the bed. Here's my pile of art waiting for me to do something with it. Note the ugly blue rug again. Man I hate that rug.
Showing posts with label master bedroom. Show all posts
Friday, October 28, 2011
Tuesday, June 14, 2011
At Home: The Etsy prints are finally up!
You may remember the master bedroom used to look like this:
And then it looked like this:
And then this:
Well now it looks like this:
Yes, I finally decided what to hang above our bed.
I bought these adorable prints from a shop on Etsy called Bee Things. It's run by a husband and wife team and is filled with the hippest collection of animal and bird prints reminiscent of Charley Harper. I first fell in love with the terns, but then I saw the cute little owl hovering over the snowy barn. And then I saw shipping was free on the second item, and that sealed the deal.
When my two prints finally arrived, I pulled them out of their paper mailer and admired them for a while and then carefully slipped them back into their safe little cardboard home. I repeated this process every so often for quite a while until finally deciding it was time to order some frames. After carefully weighing my options (you must know by now, I'm a VERY slow decorator.), I decided I wanted a silver metal frame with no mat. I always choose to mat artwork, so this was a major departure for me. But I really liked the way they looked in just a frame in the sample photos on the Etsy site and decided there was enough negative space around them to go the sans mat route. So I sent away for a selection of silver frame samples from Graphik Dimensions, my favorite frame supply shop. Then I took some more time deciding on which silver frame looked the best. I finally selected a simple, slightly frosted version. I think they "terned" out great. Wow. Did I just type that?
Labels:
art,
at home,
before and after,
decorating,
master bedroom
Tuesday, February 08, 2011
At Home: It's curtains for you!
I was planning on making curtains for our bedroom but ended up at Ikea again. Sound familiar? Perhaps you're reminded of the duvet cover that I was going to make but ended up buying at Ikea. It seems like Ikea is zapping my sewing creativity. In reality, it's probably helping me to actually complete this bedroom. Knowing my tendency towards perfection which leads to procrastination, I don't think I'd ever get this room done if it WEREN'T for Ikea.
I ended up choosing the RITVA curtain panels in a lovely charcoal grey. I only bought one pair becauseI'm cheap I wanted to hang them on the outer side of each window so they would flank the bed. At first I hung them on the two separate curtain rods, but they looked ridiculous (sorry I forgot to take pictures.), so I resigned myself to the fact that I was going to have to go back and buy a second set. But then I found a bunch of curtain rods in the attic - score! I was able to take two rods and push them together to create one really long curtain rod. It made all the difference because it framed the entire wall and made the windows look like part of a larger picture, if you will.
I hung those little decorative cones (also from Ikea) to add some visual interest and to cover the connection point of the two curtain rods (clever, huh?). I'm not completely sold on them, but for now I like them well enough. I'm wondering if it would help if I put some flowers or herbs in them. What do you all think?
Next up, I need to figure out the artwork above the bed (notice I removed the Matisse print?). More on that soon.
I ended up choosing the RITVA curtain panels in a lovely charcoal grey. I only bought one pair because
I hung those little decorative cones (also from Ikea) to add some visual interest and to cover the connection point of the two curtain rods (clever, huh?). I'm not completely sold on them, but for now I like them well enough. I'm wondering if it would help if I put some flowers or herbs in them. What do you all think?
Next up, I need to figure out the artwork above the bed (notice I removed the Matisse print?). More on that soon.
Labels:
at home,
before and after,
decorating,
master bedroom
Wednesday, January 12, 2011
At Home: master bedroom update
One of the biggest hurdles I face when it comes to my work is a constant, sometimes crippling, quest for perfectionism. "I'll post pictures of my bedroom when it's finished and perfect." "Before I upload this new item, maybe I should change the name of my Etsy shop to something better." And the list goes on. I can't tell you how many times I've wasted months of my creative energy stuck in "perfect."
The other day it occurred to me, one of my favorite blogs, Young House Love, never waits to post updates of their home. In fact, that's what makes their blog so great. They take us along for the journey. And isn't the journey the whole point? So I'm going to start embracing the journey and try not to get caught up in making everything perfect before I share it with you.
To begin with, I'm going to share some photos of our bedroom. If you recall, it used to look like this:
Ouch! Some serious adjustments need to be made here! I had already painted the bedroom the purply grey (Behr Manhattan Mist) a while back. Well, mostly painted...check out the area above each window - stellar! It's actually hard to see from the photos, but trust me, it was left unpainted for about four and a half years and it looked terrible. I didn't want to spend more money on paint, so I decided to keep the bedroom the same color and just give it a second coat (or a first coat if we're talking about the area above the windows). It's amazing how a fresh, clean coat of paint can make a world of difference. I then repainted the window trim and baseboards with a fresh coat of white. Things were finally starting to look good around here!
Once I finished the painting, I needed to re-address the duvet cover dilemma. For months, I had been looking online and at Joann's for fabric to make a cover myself, but I just couldn't find anything I liked. And the fabric I did like wasn't even close to within my budget. I also started to realize I was making things harder then they needed to be, as usual. When was I really going to make the time to sew this duvet cover? I mean my sewing table is practically buried by fabric and clothing that needs repair. So I finally relented and bought a lovely cover from Ikea for about $50 (including two pillow shams).
With the duvet cover dilemma resolved, I turned my sights to curtains. Yes Mom, I said curtains. Yes, those things you've been trying to get me to hang throughout my house since the day we moved in. Needless-to-say, I'm not a huge fan of curtains, but I decided our bedroom could use some softening (something curtains would do nicely). The previous home owners had kindly left all the curtain rods with the house, because they assumed I was a normal person and hung curtains. Instead, I took most of them down and stored them in the attic. But I left the rods in the master bedroom because I liked them and had plans to use them one day.
However, there was one thing about those curtain rods I didn't like: their placement. From the year I spent working in the Decor department at Home Depot, I knew they needed to be hung several inches beyond the window trim, but these were hung directly on the trim and they looked terrible. It's been annoying me since day one. So I started measuring and drilling. I should mention that at this point in the story I've already told you I painted the trim around the windows, and I want to assure you I'm not a total idiot. I didn't paint AROUND the curtain rods. I took the rods down, spackled and painted. So in actuality, the rods are not hanging on the trim at this point in the story, but I wasn't talking about curtain rods and curtains three paragraphs back, so it didn't make sense to bring it up then. :)
Once I finished hanging the curtain rod brackets, I grabbed one of the old curtain rods and placed it over the window. At which point I realized it wasn't long enough to bridge the gap between both brackets! Crap! And I was doing so well, too! I should qualify the statement above. Technically, they ARE long enough, but as you'll see in the photo below, they dip down in the center because they're about a half an inch shy of completely separating. Trying to hang curtains on them would most certainly result in catastrophic failure. Not to be deterred, I decided to use the old finials (decorative ends of the curtain rod) but to replace the rod itself with a longer wooden dowel.
Now you may be asking yourself, "Why doesn't she just move the brackets?" Well, I thought about that, but the thing is, even if the rods had fit width-wise, they still needed to be replaced with a solid rod (or dowel) because the rod itself was made out of two metal tubes, one smaller than the other. The connection where one half of the rod slips into the other larger half of the rod will show, and we can't have that! So I went to Lowe's (the horror! Remember I said I used to work at Home Depot?) and bought a couple dowels. When I got home I realized they were also too short. I have now done what I should have done from day one - MEASURED! Pesky math! Unfortunately, I haven't taken the time to buy longer dowels yet. For now, the old ones are just hanging there (by a thread) until I can replace them with my dowel version, so this is where we stand. I promise to update you all when I make more progress, but for now this is what the bedroom looks like:
..............................................................................................................................................
Product Details:
• duvet cover: Ikea
• framed print over bed: Henri Matisse. You can find it here.
Labels:
at home,
before and after,
decorating,
master bedroom
Tuesday, October 12, 2010
Seeing spots
Since we're still waiting for our new couch to arrive, I've put the living room redo on hold and moved on to the master bedroom. I found a quart-sized can of flat white paint leftover from the last owners of our townhouse. I figured since the ceiling was already white this would be enough paint to give it a quick refresher coat. Wrong. The ceiling sucked up that paint like a milkshake. I got about half of it finished when I ran out of paint. I basically painted over all the dirty and patched areas and hoped they blended with the still-looks-pretty-good part of the ceiling when everything dried. Then I found a second quart-sized can of white paint, this one in eggshell finish instead of flat finish. In hind sight, I probably could have mixed the two together and possible had enough to paint the entire ceiling. Oh well. At this point I should have stepped away from the ceiling and let it dry completely to see if the streaks went away. Instead I convinced myself that since this was eggshell instead of flat maybe it would spread farther. Wrong again - as you can see by the huge shiny white splotches all over the ceiling.
Half a day waisted and not much to show for it. Not to worry. I went to Home Depot this morning and bought the cheapest can of flat white paint I could find (under $8). It's the crappiest paint I've ever worked with. I'm definitely going to have to apply two coats but that's OK. It was cheap and it will do the job just fine.
Labels:
at home,
diy,
master bedroom,
painting
Thursday, June 17, 2010
At Home: bedroom redesign
Recently I've become obsessed with all things relating to interior design. There are some amazing room transformations on the web done by everyday people on a budget, and I for one am super impressed. So I've decided it's time to properly decorate my bedroom. We've been living in our townhouse for almost five years, and I still don't feel like any of the rooms are complete. Since the house was built in the mid seventies, you won't find any hardwood floors tucked beneath the carpets. No, I'm stuck with carpet, so I'm just going to have to take some advice from Tim Gunn and "Make it work."

Anyone who knows me knows I don't like to spend money, and true to fashion, I don't want to spend much on this bedroom project, so I'm on the hunt for fabric to make a duvet cover for our bed since bedding is SOOOO expensive. Of course, I never make things easy on myself, because even though I'm thrifty, I'm not cheap. I'd rather buy a higher quality item once than a piece of junk that I'll have to replace again in a few years. I'm also concerned about health (hubby has really bad allergies), and I'd love to support a company that still produces their fabric right here in the good ol' US of A. So I've already set myself up for failure. Oh, and did I mention I have VERY specific ideas about the fabric design I'm looking for? So let's recap: I want an organic fabric, made in the USA, with an amazing design, for under $8/yard. Stay tuned to find out how well that works out.
Before I sign off, here's a few photos of our bedroom in its current state. I wish I had taken a photo BEFORE I had cleaned it up (Yes, this is the cleaned-up stage. I'm married to a technology geek. There's only so much a girl can do to de-clutter when everything has a cable attached to it!). The excessive clutter almost sent me to the looney bin (in all fairness, I'm equally responsible for the clutter that existed in this space.). Even in it's relatively de-cluttered state, I think the photos still give you a good idea about how desperately this room needs a makeover. Stay tuned.

Labels:
at home,
decorating,
diy,
master bedroom
Subscribe to:
Posts (Atom)